Deploying DeepSeek-R1 Locally with vLLM on Ubuntu
 Created by AI with DALL·E
With the rapid advancements in AI, running large language models locally has become an attractive alternative to cloud-based solutions. DeepSeek-R1, a state-of-the-art open-source model, enables advanced reasoning and problem-solving capabilities. Deploying it locally on Ubuntu within WSL (Windows Subsystem for Linux) offers enhanced privacy, reduced latency, and greater control over performance.
This guide will walk you through setting up DeepSeek-R1 on Ubuntu (WSL) using vLLM, a highly efficient inference engine. Whether you’re an AI enthusiast, a developer, or a researcher, this step-by-step tutorial will help you harness the full power of DeepSeek-R1 on your local machine.
Understanding DeepSeek-R1
DeepSeek-R1 is a state-of-the-art open-source reasoning model built on a Mixture of Experts (MoE) architecture, featuring 671 billion parameters. Uniquely, it activates only 37 billion parameters during each forward pass, balancing performance and efficiency. This design enables advanced reasoning capabilities, making it suitable for complex tasks in mathematics, coding, and logical analysis.
Advantages of Local Deployment
Running DeepSeek-R1 locally on Ubuntu within WSL offers several benefits:
- Data Privacy & Security: Your data remains on-premises, ensuring confidentiality without third-party access.
- Offline Functionality: Operate without an internet connection, ensuring availability in remote or secure environments.
- Customization & Flexibility: Tailor the model to specific needs, integrate with local applications, and fine-tune parameters.
- Performance & Speed: Experience reduced latency and faster response times by leveraging local hardware resources.
- Cost Efficiency: Eliminate recurring cloud service fees and manage resources based on actual requirements.
Prerequisites
Before proceeding, ensure your system meets the following requirements:
Hardware:
- A GPU with CUDA support (NVIDIA GPUs recommended for optimal performance).
- Minimum 16GB RAM (32GB or more recommended for large-scale tasks).
- SSD storage for faster model loading and inference.
Software:
- Ubuntu (running on WSL2 with GPU support enabled).
- Python 3.8 or higher.
- CUDA 11.6 or higher (for GPU acceleration).
- PyTorch or TensorFlow (depending on the chosen backend).
- Git and virtual environment tools for dependency management.
Setting Up WSL for DeepSeek-R1
1. Install WSL2 and Ubuntu
Before starting, ensure that WSL2 (Windows Subsystem for Linux) is installed on your system. If it is not installed, follow these steps:
wsl --install -d Ubuntu
-
Restart your system if prompted.
-
Once the installation is complete, open Ubuntu from the Start menu and set up your user credentials.
1. Alternative: Using a Cloud-based GPU Instance
For students who want to run their workloads on a GPU-enabled instance, they can opt for cloud providers. A great option is Vultr (vultr.com), which offers GPU-enabled instances and provides free sign-up credits for new users.
Other cloud providers, such as AWS, GCP, and Azure, also offer GPU instances, and they also provide free credits, an extra advantage for those looking for a cost-effective solution.
2. Enable GPU Support in WSL2
Ensure you have the NVIDIA drivers installed and CUDA set up:
sudo apt update && sudo apt upgrade -y
sudo apt install -y nvidia-cuda-toolkit
Confirm CUDA installation with:
nvcc --version
3. Install Dependencies
sudo apt install -y python3-pip git
pip install --upgrade pip
Installation Methods
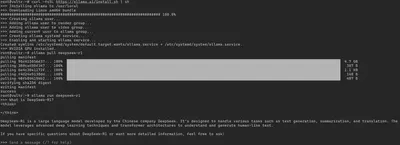
1. Using Ollama
Ollama simplifies the management of AI models locally.
Step 1: Install Ollama
curl -fsSL https://ollama.ai/install.sh | sh
Step 2: Install DeepSeek-R1 Model
ollama pull deepseek-r1
Step 3: Run DeepSeek-R1
ollama run deepseek-r1
Step 4: Test the Installation
Interact with the model by entering prompts in your terminal.
2. Using vLLM
vLLM is optimized for efficient inference with transformer-based models. It enables high-throughput and low-latency inference, making it ideal for deploying LLMs (Large Language Models) in production environments.
Note:: For a detailed step-by-step guide on how to install and run vLLM with DeepSeek locally, students can follow this instructional blog post: Running DeepSeek with vLLM Locally where they can use Jupyter Notebook to follow along with the instructions and experiment with vLLM interactively.
Step 1: Install vLLM
Ensure you have pip installed, then run:
pip install vllm
Step 2: Download DeepSeek-R1 Model
Clone the repository and navigate to the directory:
git clone https://github.com/deepseek-ai/deepseek-r1.git
cd deepseek-r1
Step 3: Load the Model with vLLM
Initialize the model:
python -m vllm.entrypoints.api_server --model deepseek-r1
Step 4: API Access
Interact with DeepSeek-R1 via API calls for various applications.
3. Using Transformers (Hugging Face)
The Transformers library allows for flexible model loading and customization.
Step 1: Install Dependencies
pip install transformers torch accelerate
Step 2: Load the Model
In a Python script or interactive session:
from transformers import AutoModelForCausalLM, AutoTokenizer

tokenizer = AutoTokenizer.from_pretrained("deepseek-ai/deepseek-r1")
model = AutoModelForCausalLM.from_pretrained("deepseek-ai/deepseek-r1")
Step 3: Generate Text
Test the model’s functionality:
input_text = "What is DeepSeek-R1?"
inputs = tokenizer(input_text, return_tensors="pt")
outputs = model.generate(**inputs)
print(tokenizer.decode(outputs[0]))
Step 4: Fine-Tuning (Optional)
For advanced users, fine-tuning DeepSeek-R1 on custom datasets can be achieved using the Hugging Face Trainer API.
Troubleshooting Common Issues
-
CUDA Not Recognized: Ensure CUDA is installed and accessible by verifying with
nvcc --version. -
Memory Errors: Reduce batch size or switch to CPU mode:
model = AutoModelForCausalLM.from_pretrained("deepseek-ai/deepseek-r1", device_map="cpu") -
Slow Performance: Optimize by using TorchScript or ONNX.
By following this guide, you can efficiently set up and run DeepSeek-R1 on Ubuntu within WSL2, leveraging local resources for enhanced performance and privacy.